Arbutus Hardwood Floors

Can you stain hardwood floors a different color?

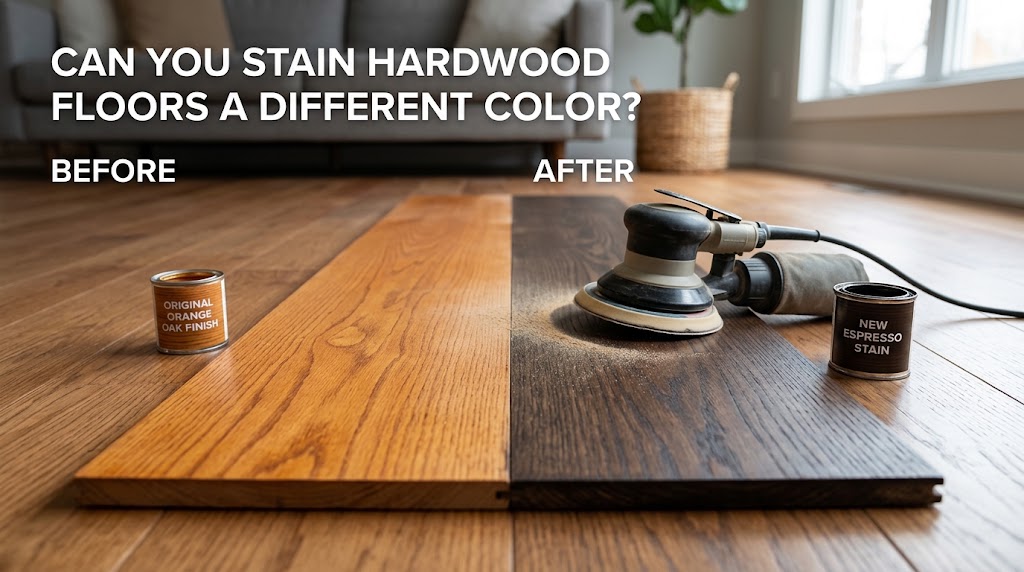
Can you stain hardwood floors a different color? Yes, absolutely. Most solid hardwood floors can go darker, lighter, or be transformed into a completely different tone altogether. The catch is that it always starts with sanding the old finish and stain completely off the wood. Plenty of homeowners ask this after living with an outdated orange oak or a dark espresso they no longer love. The good news is that the wood itself is rarely the problem the color lives on the surface, and with the right process, it can easily change.

Quick answer: To change the color of hardwood floors, the old finish and stain must be sanded off down to bare wood. New stain is applied, then a clear protective finish on top. Going darker is easy. Going lighter is harder and depends on how deep the old stain went and what species the wood is. Engineered floors can only be restained if the top layer is thick enough to sand.

Here’s how the process works, what each color change really involves, and how to avoid the mistakes that leave people with a floor they like even less than before.

Why you can’t just stain over the old color

New stain needs to soak into bare wood. A floor that’s been finished with polyurethane has a clear plastic-like coating on top, and stain can’t pass through it. If you brush stain over an intact finish, it sits on the surface, looks blotchy, and wipes or wears away.

There are products sold as gel stains or toners that go over existing finish. They can change the tone a little, but they don’t last. They scratch off in walkways and can leave a muddy look. We wouldn’t recommend them for a whole floor.

If you only need to refresh a tired finish and keep the current color, there’s a lighter option. Our guide to refinishing hardwood floors without sanding explains when a screen and recoat does the job. Changing color is a different story, because color lives in the wood.

How the Process Works: Can You Stain Hardwood Floors a Different Color?

A color change is a full hardwood floor refinishing project. These are the steps:

  1. Sand to bare wood. The old finish and the stain in the top layer of wood are removed, usually in several passes with finer and finer sandpaper.
  2. Repair and prep. Gaps, nail holes, and damaged boards are fixed. The floor is vacuumed thoroughly so no dust ends up in the stain.
  3. Test the color. Samples are applied on a spare board or hidden area, in the room’s real lighting.
  4. Apply the stain. Stain goes on in even sections and the excess is wiped off.
  5. Let it dry. Water-based stains dry faster than oil-based. Dry time depends on the product and the room.
  6. Apply protective finish. Usually two or three coats of polyurethane, with light abrasion between coats.
  7. Cure. The floor feels dry long before the finish hardens fully. Rugs and heavy furniture wait.

A main floor typically takes four to seven days from start to finish, depending on size, product, and drying conditions.

Going darker vs going lighter

This is where expectations and reality often split.

Going darkerGoing lighter
How hardStraightforwardHarder, less predictable
WhyDark stain covers what’s left in the woodOld stain pigment must be sanded out first
RiskShows dust and scratches moreOld color can show through
Typical resultVery reliableDepends on species and how deep the old stain went

Going darker is the easy direction. Once the floor is sanded, a darker stain simply covers whatever is left. It’s also the better choice if you want to hide old stains or uneven color.

Going lighter means removing the old stain from the wood itself. Stain soaks in, so sanding has to cut deep enough to take that color out. If the old stain is dark and the floor was stained heavily, some tone may remain after sanding. Pushing for a very pale or white look can need bleaching or special products, and results vary by wood. This is professional work, and it’s worth having a sample done before you commit.

Pro Tip: Ask for a sample on your own floor before you pick a color. Small stain cards and online photos rarely match how a color looks on your species of wood in your room’s light. A test patch costs a little time and can save you from a floor you didn’t mean to have.

How wood species changes the color you get

The same stain looks different on different woods. Grain, density, and natural color all affect the result.

SpeciesHow it takes stainThings to know
Red oakTakes stain evenly, shows grainHas pinkish undertones that can show through some colors
White oakTakes stain well, cooler tonePopular for natural and neutral looks
MapleTight grain, can look blotchy with dark stainOften needs conditioning or a gel approach
HickoryStrong grain contrastStain exaggerates natural color variation
WalnutAlready darkUsually left natural or lightly toned
BirchCan blotchSimilar care to maple

This is why a color you love on a sample photo may not match on your floor. If you’re not sure how your species will respond, a professional can tell you before sanding starts. For floors that need a more unusual look, our custom hardwood flooring work is another path.

How the finish changes the final color

Stain isn’t the only thing that changes how a floor looks. The clear finish on top matters too.

  • Oil-based polyurethane has a warm, amber tone that deepens over time. It makes wood look richer and slightly more yellow.
  • Water-based polyurethane dries clear and keeps the color closer to what you chose. It’s a common pick for pale, natural, and gray-toned floors.
  • Sheen matters. Matte and satin hide scratches and dust better than gloss, and they suit the soft, natural look many homeowners want now.

Mention the finish when you pick your stain. The same color can read warmer or cooler depending on what goes over it.

Choosing a stain color that works in Calgary homes

A few practical things worth thinking about before you choose:

Light. Calgary has bright winter sun and long, dim evenings. Rooms with a lot of south-facing light can handle richer, deeper tones. Darker, north-facing rooms often feel better with lighter or warmer floors.

Maintenance. Very dark floors show dust, pet hair, and scratches. Very light or white-washed floors show dirt less, but can reveal wear differently. Mid-tone, natural-looking colors are the most forgiving.

Style. Warm, natural wood tones are popular right now, and many homeowners are moving away from the cold gray floors that were common a few years ago. Trends change, though, so choose something you’ll still like in ten years.

Dry winter air. Our indoor air gets very dry once the furnace is on. Whatever color you pick, seasonal gapping can happen, and it shows more on some tones than others. See our guide to hardwood floor gaps in Calgary winters for what’s normal.

Can you restain engineered hardwood

Sometimes. It depends on the thickness of the wood layer on top of the board. Engineered hardwood has a thin hardwood veneer over a plywood core, and a full sand to change color removes part of that veneer.

If the veneer is thick enough, one color change may be possible. If it’s thin, sanding could go through it and ruin the board. Many prefinished engineered floors can’t be restained at all. Check the manufacturer’s information or have a professional measure before you plan on it. We cover wear layer limits in our guide to hardwood floor refinishing vs replacement.

How much does it cost to change hardwood floor color

Changing color follows the same price as a standard full refinish, plus extra for stain and prep. These are rough Calgary-area estimates, not quotes:

ItemTypical cost
Full sand and refinishAbout $3 to $6 per sq ft
Custom stain or color changeAdds roughly $1 to $2 per sq ft
Bleaching or special lighteningQuoted individually
Sample test patchOften included in a good quote

Your price depends on floor size, condition, species, and the product system used. For a wider picture of what each flooring job costs, see our hardwood flooring cost guide.

Common mistakes when changing floor color

  • Picking a color from a photo. Screens lie. Always test on your floor.
  • Skipping the sample. This is the most common reason people end up unhappy.
  • Going too light on red oak. The natural pink tone can fight against pale colors.
  • Staining over old finish. It won’t absorb properly and often fails.
  • Not allowing enough dry time. Rushing the finish coats can trap moisture and cause cloudiness or peeling.
  • Ignoring the wood’s thickness. If a floor has already been sanded several times, another full sand may not be a safe option.

If your floor has serious damage, such as deep stains, warping, or loose boards, those should be handled first. Our hardwood floor repair service can fix individual problem areas so the new color goes onto a sound surface.

Frequently asked questions

Can you change hardwood floor color without sanding?

Not properly. Stain can’t penetrate an intact finish. Toners and gel stains can shift the tone a little, but they wear off quickly and aren’t a lasting solution.

How many times can you restain hardwood floors?

Solid hardwood can usually be sanded four to six times over its life, so a few color changes are possible, though each full sand uses up some of that. Engineered floors typically allow one or two.

Can I stain my floor white?

You can get very light, white-washed looks, but true white stain on wood is difficult. Results depend on species, and bleaching may be needed. Ask for a test sample, because the finish and the wood’s natural color both affect it.

What’s the most popular hardwood stain color?

Natural and warm mid-tone oak shades are widely chosen, with satin or matte finishes. The best color is one that suits your light, your furniture, and how you live.

Will a darker stain hide scratches and pet damage?

It can hide small scratches better than very light colors in some cases, but dark floors often show dust, pet hair, and light scuffs more. Sheen matters as much as color here.

How long before I can walk on a freshly stained floor?

Light foot traffic is often possible after the finish has dried, which is usually the next day for water-based products. Full cure takes longer, so keep rugs and heavy furniture off until your contractor says it’s ready.

Making the change with confidence

So, can you stain hardwood floors a different color? Yes. A fresh color is one of the most effective ways to update a home, and solid hardwood is built to be redone. Plan for full sanding, test the stain on your actual floor, and consider your wood species before you decide.

Thinking about a new look for your floors? Contact Arbutus Hardwood for a free assessment in Calgary, Airdrie, Cochrane, Okotoks, Chestermere, or nearby. We’ll check your wood, show you samples, and give you a clear quote. You can also read about painted floors in our guide on whether you can paint hardwood floors, or learn more from the National Wood Flooring Association.

7 Easy Ways to Clean Hardwood Floors | Best Methods & Tips

 7 easy, expert-approved ways to clean hardwood floors and keep them shining. Tips from Calgary’s hardwood flooring pros to protect your finish.

If you’ve got hardwood in your home, you already know the drill. One week the floor looks like it just came out of the showroom. Next, there’s a haze over it that no amount of sweeping seems to fix.

Learning how to clean hardwood floors the right way is a lot simpler than most cleaning blogs make it sound. You don’t need a cabinet full of products. You need the right tools, the right order of steps and a little restraint with water.

We’ve spent over 30 years installing, sanding and refinishing hardwood floors across Calgary. A big chunk of the repair calls we get started the same way: someone used the wrong cleaner, too much water or a steam mop they picked up at a big box store. So this guide isn’t a theory. It’s what actually keeps a hardwood floor looking good for decades instead of years.

Here are 7 ways to do it right, plus what to avoid, how to tell when cleaning isn’t enough and a few things specific to Calgary’s climate.

Why hardwood floor care matters more than people think

Wood isn’t like tile or vinyl. It breathes. It reacts to moisture in the air and moisture on its surface, which means the wrong cleaning routine doesn’t just leave streaks. It can cause the boards to cup, gap or lose their finish years before they should.

The National Wood Flooring Association puts it plainly: routine cleaning should involve sweeping, dust mopping or vacuuming, with spills wiped up immediately using a dry or barely damp cloth. Wet mops and steam mops sit on their “don’t” list for good reason. Once moisture works its way into a seam, there’s no undoing it with a towel.

That’s the real reason this guide exists. A good cleaning routine protects an investment that isn’t cheap to replace. It’s also a lot cheaper than the repair bill that follows years of the wrong habits.

We’ve walked into homes where the owner swore they only ever used a damp mop. The boards along the kitchen window still cupped from years of condensation nobody noticed. Small habits add up. That’s true whether they’re good ones or bad ones.

What you’ll actually need

What you'll actually need

Before getting into the steps, here’s the short list of tools worth keeping on hand. You don’t need everything at once, but having these ready makes the routine below take minutes instead of an hour.

Tool

What it’s for

Soft-bristle broom

Daily sweeping without scratching the finish

Vacuum with hard floor setting

Lifting debris from seams and corners

Dry microfiber mop

Catching fine dust between vacuum sessions

pH-neutral hardwood cleaner

Safe deep cleaning without stripping the finish

Damp microfiber mop

Applying cleaner without soaking the floor

Dry towel

Removing excess moisture right after mopping

Felt furniture pads

Preventing scratches under chairs and tables

Skip anything with “all-purpose” on the label unless it specifically says hardwood safe. Generic cleaners are built for tile and laminate. They don’t play well with a finished wood surface.

1. Sweep or vacuum first, every time

This sounds obvious, but it’s the step most people rush through.

Dust, grit and tiny bits of outdoor debris act like sandpaper under socks and shoes. Walk over the same patch of floor a few hundred times with grit underneath and you’ll wear a dull track into the finish, usually right where people walk most: hallways, in front of the sink, near the front door.

A soft-bristle broom works fine for daily upkeep. If you’re vacuuming, switch to the hard floor setting or a brush attachment. Skip the beater bar. Those rotating brushes are built for carpet fibers, not finished wood. They’ll leave fine scratches you won’t notice until the light hits the floor at the wrong angle.

Aim two to three times a week. Homes with pets or kids probably need it daily, especially near entryways where most of the grit gets tracked in first.

Solid hardwood and engineered hardwood handle this step the same way, since the finish sitting on top is what’s actually being protected, not the wood underneath it. The difference between the two only really matters once you get into deeper cleaning or refinishing, not for daily sweeping.

2. Follow up with a dry microfiber mop

Vacuuming gets the big stuff. It misses the fine dust that settles into the grain and corners.

A dry microfiber mop picks up what’s left behind without adding any moisture. Run it over the floor after vacuuming, especially before doing any wet cleaning. This step also makes a deep clean faster later, since you’re not mopping through a layer of dust that turns into grey sludge the second it meets water.

If you’ve got a lot of pet hair, a dry mop with a static charge does a better job than a broom at grabbing it. Wash the mop head every couple of weeks so it keeps working the way it should.

3. Mix a cleaning solution made for hardwood

Not every cleaner belongs on a wood floor.

The safest bet is a pH-neutral cleaner made specifically for hardwood. Check what finish your floor has first. Oil finishes, wax finishes and polyurethane finishes all respond differently to cleaning products. Using the wrong one can leave a dull film or strip the protective layer entirely. If you’re not sure which one you’ve got, our breakdown of oil-based vs water-based floor finishes walks through how to tell the difference and what each one needs.

Dilute the product exactly as the label says. More isn’t better here. Excess cleaner just sits on the surface, attracts dirt and leaves streaks once it dries.

A quick test before doing the whole floor: try the diluted mix in a closet or under a piece of furniture. Wait for it to dry fully. If there’s no discoloration or dulling, you’re good to go.

4. Mop with barely any water

Mop with barely any water

This is where most people go wrong.

Wring the mop out until it feels almost dry to the touch. You’re aiming for a light dampness rather than a wet sheen. Work in the direction of the wood grain and rinse the mop head often so you’re not just pushing dirty water around the room.

Once you’re done, go over the floor again with a dry towel or a clean, dry microfiber mop. Standing water is the number one cause of the repair calls we get, especially in kitchens and near patio doors. If you’ve ever dealt with cupped or discolored boards near a sink, our page on water-damaged hardwood repair covers what usually causes it and how it typically gets fixed.

Small sections at a time work better than mopping the whole room in one pass. It’s slower, but the floor never sits wet long enough for moisture to become a problem.

5. Handle spills the second they happen

A spill sitting for five minutes is a lot easier to clean than one that’s been there overnight.

Grab a dry cloth or a barely damp one and wipe it up right away. For anything sticky like juice or sauce, a small amount of hardwood-safe cleaner on a cloth works better than dumping water straight onto the boards.

The longer moisture sits, the more chance it has to seep between planks. That’s usually how small, forgettable spills turn into swollen or discolored boards months later, long after anyone remembers what caused it. Keep a few microfiber cloths under the kitchen sink so you’re never digging through a cupboard while a puddle spreads.

6. Deep clean once a month

Weekly sweeping and light mopping handle surface dirt. They don’t touch the grime that builds up in the wood grain over weeks of foot traffic.

Once a month, go over the whole floor with a hardwood cleaner and a barely damp mop, working in smaller sections so nothing sits wet too long. If you’ve got a large open floor plan, split the job across a couple of days rather than rushing it in one go.

If your floor still looks dull after a deep clean, that’s usually not a cleaning problem anymore. It’s a finish problem. No amount of scrubbing fixes worn-through finish. That’s when polishing or refinishing comes in. It’s worth knowing the difference before spending money on either. A professional hardwood floor polishing service can restore shine on a finish that’s still intact, while our guide on polishing vs refinishing hardwood floors breaks down which one actually fits your situation.

7. Protect the floor between cleanings

Cleaning is half the job. Preventing damage is the other half. It’s a lot less work.

A few habits go a long way:

  • Take shoes off at the door. Outdoor grit is the main culprit behind scratched finishes.
  • Use felt pads under furniture legs and check them every few months since they wear down.
  • Put rugs in high-traffic spots like entryways and hallways.
  • Trim pet nails regularly if you’ve got dogs running across the floor.
  • Keep indoor humidity somewhere between 30 and 50 percent, since wood shrinks and swells with the seasons.
  • Rotate area rugs occasionally so the boards underneath age evenly with sun exposure.

None of this takes long. It just needs to become routine, the same way you’d wipe down a counter without thinking twice about it.

What not to use on hardwood floors

A few products and tools show up over and over in the “how did this happen” conversations we have with homeowners.

Avoid this

Why it causes problems

Steam mops

Heat and moisture push into the wood and cause swelling or warping

Wet mops or soaked cloths

Standing water seeps into seams and causes cupping

Vinegar or citrus cleaners

Acidic ingredients break down the finish over time

Bleach or ammonia

Strips finish, discolors wood and can void warranties

Oil soaps

Leave residue that attracts dirt and interferes with refinishing later

Abrasive scrubbers

Steel wool and rough pads scratch the finish

If a product isn’t specifically labeled safe for hardwood, skip it. It’s not worth the risk to a floor that took real money to install in the first place.

Signs your floor needs more than a cleaning

Signs your floor needs more than a cleaning

Sometimes the floor looks tired no matter what you do. That’s a different problem than dirt.

Deep scratches that catch a fingernail, boards that feel soft or spongy underfoot, gaps that open and close with the seasons or a finish gone matte in patches are all signs the wood itself needs attention rather than another round of mopping. Our page on signs you need hardwood floor repair goes into more detail on what to look for and when it’s worth calling someone in.

Waiting rarely helps in these cases. A small repair now is almost always cheaper than a full hardwood floor repair job after the damage spreads across more boards.

A note for Calgary homes

Calgary’s dry winters are tough on hardwood. Indoor heating strips moisture from the air. Wood responds by shrinking, which is why gaps between boards tend to show up around January and February then close back up by summer.

Chinooks make things trickier. A sudden swing from minus 20 to plus 10 in a single day pulls moisture out of the air fast. Wood floors feel that shift even indoors. Running a humidifier through the colder months helps a lot. So does holding off on wet cleaning right after a big temperature swing, when humidity levels are still catching up.

If your floor has already developed noticeable gaps or a dull finish from a rough winter, sanding and refinishing brings it back without replacing a single board. Our dustless hardwood floor refinishing process handles this without turning your home into a construction zone for a week, which matters when you’ve still got to live in the house while the work gets done.

We see the same pattern every spring. Homeowners notice the gaps closing back up on their own and figure the floor fixed itself. It didn’t. The wood just absorbed enough moisture to swell again. The finish underneath is still wearing thinner every year that passes without attention. A yearly check, even just a quick look at the corners near exterior walls, catches problems long before they turn into a full refinish.

The bottom line

Clean hardwood floors come down to a handful of habits repeated consistently: sweep before you mop, use minimal water, pick products made for wood and deal with spills fast. Skip the steam mops, skip the vinegar and skip the guesswork.

Most floors that end up needing repair got there through years of small mistakes rather than one big accident. Catching those habits early saves a lot of money down the road. It also keeps a floor looking the way it did the day it was installed.

If your floor is past the point where cleaning helps, or you’re just not sure what condition it’s really in, we’re happy to take a look. Arbutus Hardwood has been installing, repairing and refinishing floors across Calgary for over 30 years. A quick assessment costs nothing. Get in touch for a free quote and we’ll tell you honestly whether your floor needs a deep clean, a polish or a full refinish.

 Sweep or vacuum two to three times a week, mop lightly every one to two weeks and do a full deep clean once a month. High-traffic homes with kids or pets should lean toward the more frequent end of that range.

Only if it's specifically labeled safe for hardwood and used sparingly. Many spray mops release more liquid than they should, so dampen a cloth by hand instead if you're not sure how much your particular model puts down.

Usually it's leftover cleaner residue, or the cleaner wasn't diluted properly. It can also mean the finish itself is worn and needs polishing or refinishing rather than another cleaning session.

 It's a common DIY suggestion, but most flooring manufacturers advise against it. The acidity slowly breaks down polyurethane and other finishes, leaving the floor duller and less protected the more it's used.

Polishing adds shine to a finish that's still in decent shape. Refinishing sands the floor down to bare wood and applies a new finish, which is what's needed once scratches or wear go deeper than the surface layer.

A proper deep clean with a pH-neutral cleaner, followed by a hardwood floor polish made for your finish type, brings back shine on floors that aren't badly worn. If the dullness persists after that, the finish itself is likely gone and refinishing is the next step.

How to choose a hardwood flooring contractor in Calgary

How to choose a hardwood flooring contractor in Calgary

How to choose a hardwood flooring contractor in Calgary Learn how to choose a hardwood flooring contractor in Calgary by checking experience, insurance, past projects and written quotes before you hire. Contact Us Your floors will be under your feet for 20 years or more. The person you hire to…

Hardwood Flooring Cost Calgary: 2026 Price & Installation Guide

Hardwood Flooring Cost Calgary: 2026 Price & Installation Guide

Hardwood Flooring Cost in Calgary: What You’ll Actually Pay Planning your project but unsure about hardwood flooring cost in Calgary? This guide explains installation, refinishing, and repair expenses to help you plan your flooring budget. Contact Us If you’re planning to install, repair, or refinish hardwood flooring in Calgary, understanding…

Matte vs Gloss Hardwood Flooring | Arbutus Hardwood

Matte vs Gloss Hardwood Flooring | Arbutus Hardwood

Matte vs gloss hardwood flooring: which finish is right for your home? Matte vs gloss hardwood flooring, see which finish suits Calgary homes best for durability, style & upkeep. Get expert advice from Arbutus Hardwood. Contact Us Matte vs gloss hardwood flooring feels like a small decision until you’re standing…

    7 Easy Ways to Clean Hardwood Floors | Best Methods & Tips 3